Small Improvements users can be viewed at a glance in the User Directory.

Adding more staff
There are many ways to get staff into the system:
- You can add staff manually right on the user directory, simply by clicking the “Add users” button at the top of the page. That’s easy, but tedious if you want to create more than some 20 accounts.
- You can create an Excel worksheet and import users in bulk.
- You can automate the user-synch for instance by connecting to your Google Apps account or by using our custom user synchronization.
- People can simply sign up by themselves, using your company’s email address. (You can disable this by the way: check the User Settings page!)
The magic column
The user directory shows you a condensed list by default, which highlights the most important attributes of employees, their direct reports, and who they report to. There is a “magic column” that defaults to the direct reports of a person. You can toggle this column to show the last login date, or the employee’s team, etc. Each column in the user directory is sortable when you click on it.
When viewing the company directory, you may want to sort employees by specific parameters. This can easily be done with the magic column which has the sparkling wand icon next to it.
If you click the icon, you can sort employees by the following:
- Location
- Hiring Date
- Direct Reports
- Team
- Secondary Reviewer
- Employee ID
- Last Login
- Creation Date
- 2-Step Verification

Searching for users
You can use the search bar to look for users. You can also use the filter dropdown to quickly reduce the search field, only showing admin users or guests. We display only active users by default, but the filter component can be used to include deactivated users:

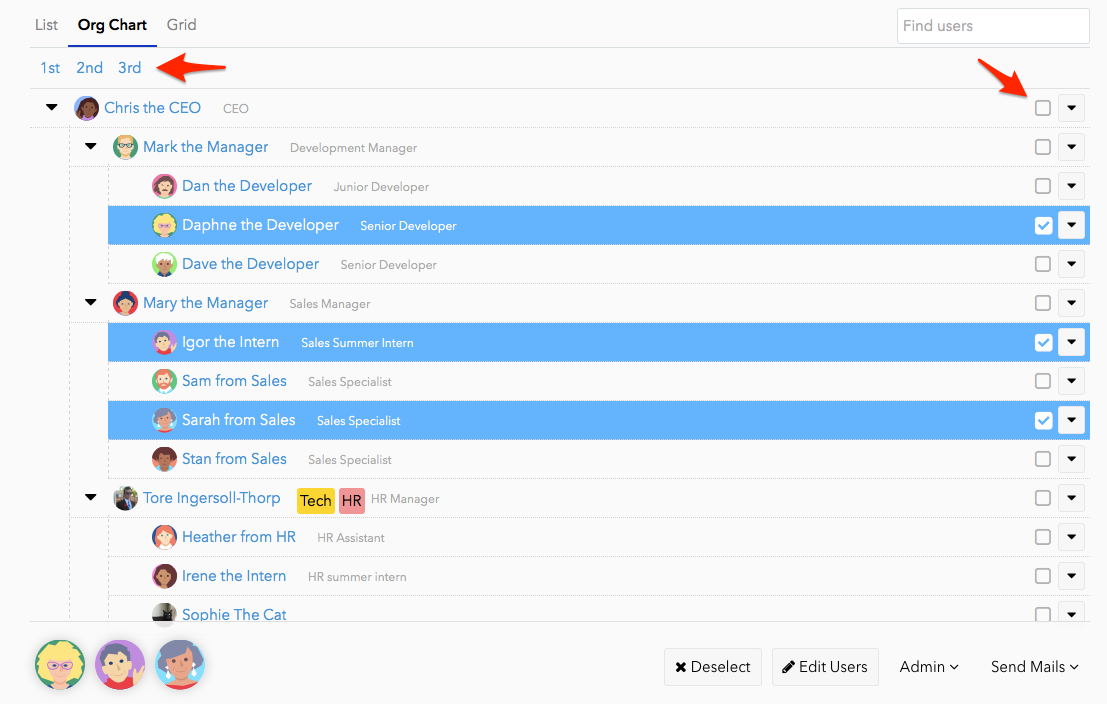
The Org Chart
The List view is perfect for sorting and filtering, but the Org Chart view is much better suited for getting an overview of the entire company’s reporting lines. Clicking the “1st, 2nd, 3rd, etc” up top will expand based on hierarchy level- And multi selecting from the org chart is even easier- As there are checkboxes to use. (no need to hold down any key!)
The Grid View
The grid view is another way to display your employees – very helpful for visual thinkers! Filter by different criteria to find exactly who you want.

Permissions
The Small Improvements user and role management is pretty simple: Everyone is either a regular employee or a guest with very limited permissions. Also, an employee can be a manager of others, which grants additional permissions both to the manager and to his or her reports.
If someone reports to your direct reports (e.g. because you’re the CEO) then you can also get insight into these indirect reports’ reviews, 360 degree feedback, and their objectives. We refer to this relationship as the indirect manager. So if Tom reports to Ahmed, who reports to Stacey- And Stacey reports to Maria- Both Maria and Stacey are Tom’s indirect managers.
In addition to being an employee, a user can have some account administrator privileges, with these three roles:
- HR Admin
- HR Assistant
- Tech Admin role
User administration actions
Clicking on the downward facing arrow next to any employee’s line in the user directory will show a series of admin actions you can take in regards to that employee:

The following common actions can be performed both from the User Directory and from the Profile page of a person:
- Edit Profile: You can change a person’s core data, like name, department, email address etc.
- Change Manager: Use this option to give an employee a new manager.
You can also clear a manager, but you usually only have to do this in case you accidentally made the CEO report to someone. By default, only HR Admins can change a person’s manager. It is possible to give this permission to HR Assistants if needed, via the “User Settings” within the Admin Overview. - Edit Permissions: If you have the privilege to assign one of the 3 roles, you can make other people HR Admin, HR Assistant or Tech Admin.
- Password and Security: Allows you to enable 2 Step Verification; clear an employee’s password, which requires them to set a new one on the next login; change password, which lets you set a new password for an employee. Note: Only HR Admins can clear or change another employee’s password
- Send password mail now: An alternative to setting (and thus knowing) people’s passwords is to trigger the password mail. It’s also perfect for new staff that just joined your company because the mail also includes a link to the system.
- Send profile nudge now: Click this to send a quick automated reminder to the person, encouraging them to update their profile data. E.g. their self-description, photo, or role and position.
- Deactivate account: If someone leaves the company, this is how to ensure they cannot login anymore.
The reporting structure
The reporting structure is determined by who reports to who, and it has implications around who can access whose reviews, feedback and objectives.
If a team member changes teams, you pick their new manager. So if “Sarah the Saleswoman” is moving from sales to the marketing team, simply set “Mary the VP of Marketing” as her new manager.
If you want to exchange a manager, or for instance swap managers between teams, you do so by picking a new manager for each team member. To swap Mark and Sally, you’d set all of Mark’s direct reports to now report to Sally, and vice versa. Since you can do this right from the User Directory, it’s actually quite easy to do so. Even moving 30 people around won’t take you more than 5 minutes.
Impacts of changing the reporting structure
It’s important to understand that the management hierarchy determines who can see whose performance reviews and objectives. The new manager instantly has access to all reviews, objectives and 360 degree feedback of people reporting either directly or indirectly to her.
So if someone “moves up” the hierarchy, e.g. gets promoted from Team Lead Sales to VP of Sales, they get to see reviews of other Team Leads they previously were on the same level with.
If someone moves laterally and takes over a new team, they get access to all that team’s reviews.
A manager who switches teams (or gets demoted) can always continue to view all reviews they signed for their previous staff. These old reviews are not accessible from the Team tab anymore, but a manager can navigate to the previous reports’ User Profile page (using the User Search box in the top right-hand corner of each screen) and click the Reviews tab. In case a review was already in progress, the old manager remains listed on the review as “owner” until the new manager starts making modifications.
User Impersonation
It is possible for super-users who have both the HR Admin role and the Tech Admin role to impersonate any other user (except those up the reporting chain). This can help you to troubleshoot issues reported by your staff, or you can redact inappropriate content easily by impersonating the offending user’s account. However, impersonation is such a very powerful feature, that it is disabled by default, and we recommend that you use a sandbox system if you merely want to try out some configuration options. You need to contact SI staff to enable it for your company account. Learn more about how the feature works on the impersonation documentation page.
Your own staff images
A common question we get is, “How can we get our employee pictures into Small Improvements?”. The easiest way is to inform your team how to upload their own profile pics as part of the kicking off process when you roll out the tool.
But if you already have all employee pictures in a central location, it is possible to configure Small Improvements so that we fetch the images from your own web server. (Based on either the employee’s email or based on their employee ID)
Such a web server is pretty easy to set up for an IT team. It may take a couple of hours, but not more than that. All that’s really required is a service that returns images based on a single URL parameter. So when you enter (for example)
https://intranet.company.com/images?id=john@company.com
Into your browser, it should display an image for John.
Click Settings > User Management and find the Employee Image Server field:
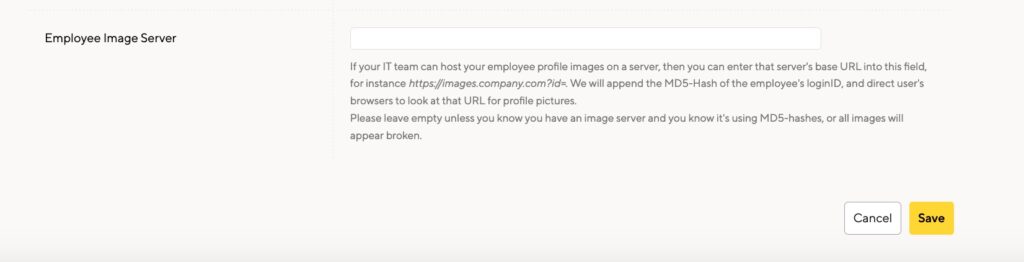
Enter the base URL (in this case, https://intranet.company.com/images?id=) into the “Employee image server” field. Then, everyone’s images are automatically pulled from your image server.
Some notes to IT if you go this route:
- You don’t want the actual email to show up in the URL, so we create an MD5-Hash of the email and send that instead.
- Since the entire application is in HTTPS, your service must use HTTPS as well, or some browsers will complain.
- Please note that really only the image gets served, not an HTML page containing an image.
- It’s the browser of a user who pulls the data, not the SI system. This is good because you can keep things inside your firewalls. But do ensure that the service can serve many requests at once (in case 5 users look at the user directory at once) and also provide reasonable expiry and caching settings.
- If you don’t want to expose the images on the internet, that’s okay, but you should make sure that it works on your VPN so that users logged in at home also get to see the images. Note that images are also used in emails, so people might want to see the images from their mobile devices too. It’s probably useful to send a grey silhouette image if access has not been authorized, so that there are no ugly “not found” error images showing up for staff.
So, that was some technical detail, and yes it does take a little time to set up. But if you’re dealing with 200+ employees, it is really worth a little extra effort in our opinion.
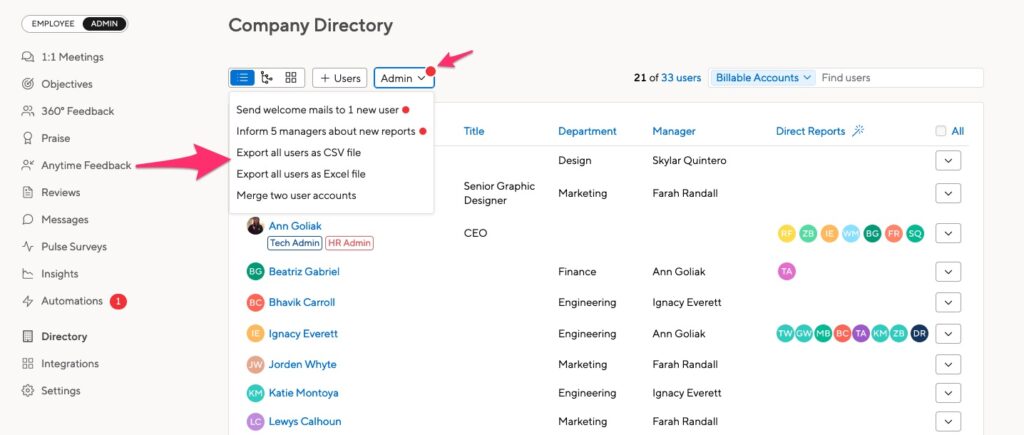
Exporting employee profile information
We offer a complete export of all your users from the company directory. This export will include information like each employee’s hiring date, manager, location, team, department, and whether they are active or not.
Because the export is in CSV or Excel format, it can be filtered in order to view specific information like active employees or only employees in a certain location.
You can export a user list from the directory by clicking the “Admin” menu then selecting “Export all users as Excel file” to run the export.